Saturday, June 7, 2025

June Tutorial Bundle: Impressions Abloom


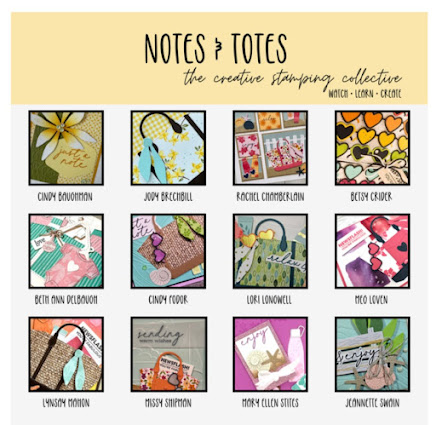
I’m so excited to share this month’s brand-new tutorial collection with you! The June bundle is here, and it features Impressions Abloom—a fresh, floral-inspired favorite that’s perfect for all your summer stamping.

This creative collection includes 12 step-by-step tutorials from some of my favorite stamping friends (and me!), each featuring unique projects using Impressions Abloom.

Get it FREE when you:
Place a $60 order with me by June 30th

Prefer to just grab the tutorials? No problem!
You can purchase this digital download directly—and even shop past months’ collections too:
👉 https://payhip.com/GreatMindsINKAlikeRachelChamberlain

Each bundle includes:

  • A supply list with measurements

  • A video demonstration link

  • Full-color photos

  • A fun variety of project ideas

Whether you’re building your card stash, looking for a creative escape, or sending thoughtful handmade cards, this bundle is packed with INKspiration to keep you crafting.

Missed a past month? No worries—tutorials are always available and perfect to work through at your own pace.

Let me know if you need help placing an order or finding a past bundle.

🖋️ Every day is a great day to send a card. 💌

Happy stamping,
Rachel

Weekend Stamp-a-Stack Recap – So Much Fun


What a wonderful weekend of stamping fun!  I hosted two Stamp Stack sessions—one Friday night and another on Saturday—and both were full of laughter, creativity, and great company. It’s always a joy to gather with friends (new and returning!) and spend time making something beautiful together.

We created eight cards total—two of each of four different designs—so everyone went home with a nice stash ready to mail. I love offering a wide variety of greeting stamps, so each person can personalize their cards for birthdays, thank yous, thinking of you, sympathy, or whatever they need most. It’s always fun to see the unique combinations everyone comes up with!

If you missed out, don’t worry! I’ve got tutorials to help you create some of these cards at home:

🎥 Peaceful View "Happy Birthday" Card
This one was featured in my last blog post—if you didn’t catch it, be sure to scroll back and take a look! Watch it on YouTube here!

🎥 "Just a Note" Fun Fold Card – Facebook Live Replay
Watch it on YouTube here!

🎥 Extraordinary Flora Card – Facebook Live Replay
Catch the tutorial here!

I love how each card turned out, and it’s even better knowing they’ll be sent out to brighten someone’s day. 💌

Thank you to everyone who joined me—I can’t wait to stamp with you again soon!

Until then, keep sharing kindness—one card at a time.

Tuesday, June 3, 2025

Serene Ink Blending with Peaceful View — Cardmaking Inspiration

Looking for a peaceful, nature-inspired card idea? This project features the Peaceful View background stamp and soft ink blending with Stampin’ Up! Blending Brushes to create a calming scene that works beautifully for birthdays, encouragement, thinking of you, or just because.

🎥 Watch the video below to see how this card comes together—from choosing your ink colors to blending tips and finishing touches:


Supplies used for this card:

  • Peaceful View background stamp

  • Blending Brushes

  • Ink pads: Early Espresso, Pool Party, Daffodil Delight, Old Olive

  • Basic White, Old Olive, and Early Espresso

  • Sentiment stamp: Happy Birthday from Round We Go

Soft ink blending is one of my favorite techniques—it’s simple, relaxing, and always delivers a wow factor. I hope this project inspires you to get your brushes out and play with color!


This card isn’t part of my current INK and Go Kit, but if you love the idea of quick and satisfying cardmaking, I’ve got you covered! My INK and Go Kits are designed for easy creativity—just grab your ink and start stamping. Each kit includes pre-cut cardstock and coordinating designs so you can make beautiful cards in minutes.

🛒 Browse current kits and tutorials here:
👉 https://payhip.com/greatmindsinkalike

Thanks for stopping by and happy stamping!


Rachel
Great Minds Ink Alike
https://payhip.com/greatmindsinkalike


Tuesday, May 27, 2025

Last Chance to Get the May "Notes & Totes Tutorial FREE!

May is almost over—which means it’s your last chance to get this month’s exclusive Notes & Totes tutorial bundle FREE with a $60 order!

This creative collection includes 12 step-by-step tutorials from some of my favorite stamping friends (and me!), each featuring unique projects inspired by the theme “Notes & Totes.” 

 Get it FREE when you:
 Place a $60 order with me by May 31st

 Prefer to just grab the tutorials? No problem!
You can also purchase this digital download directly—and even shop past month’s collections too! https://payhip.com/GreatMindsINKAlikeRachelChamberlain

Each bundle includes:

  • A supply list with measurements
  • A video demonstration link
  • Color photos
  • A fun variety of projects

June’s bundle is just around the corner—but if you missed earlier ones or want to collect them all, you still can. These tutorials are always available to purchase and perfect to work through at your own pace.

Let me know if you need help placing an order or finding a past bundle that inspires you!

Every day is a great day to send a card. 💌

Happy stamping,
Rachel

Think Outside the Box - A Graduation Card with a Twist!

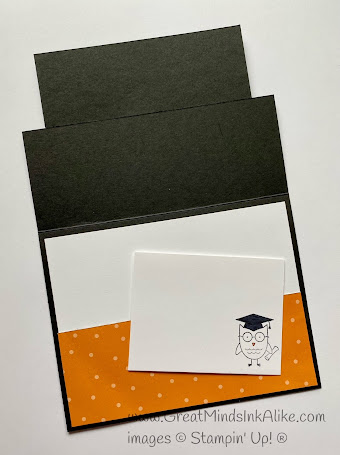
Have you ever needed a card in very specific colors—and couldn’t find anything in your stash that fit the bill? That was me this past weekend. I needed an orange and black graduation card for a special graduate and party, and I wanted it to feel coordinated and thoughtful. So, I did what any creative crafter would do: I raided my Halloween paper!


Yes, you read that right. Halloween paper! I knew I’d find orange and black in one place, and sure enough, I had a pack of retired Designer Series Paper that fit the theme perfectly. I flipped through and found some great coordinating prints. (Hot tip: There’s almost always a more neutral or subtle pattern on the back of seasonal DSP!)

I paired the paper with a fun retired stamp set, Go Graduate,
and made a matching mini note card to tuck in my personal message.


One unexpected challenge? When I opened the card, the reverse side of the DSP showed a bit of purple—which clashed with my theme. It bugged me enough that I added a piece of black cardstock to the inside to hide it. Problem solved! And then I decided to recolor the little owl on my note card to make it a bit more subtle.


This project is a great reminder that sometimes, the most creative solutions come when we’re willing to use supplies in unexpected ways. Even though I was using retired products, I still found joy in mixing and matching to create something meaningful.

So the next time you’re stuck, don’t be afraid to flip that paper over or look at seasonal sets with fresh eyes. There might be a perfect solution right there in your stash—you just haven’t seen it that way yet.

Thursday, May 22, 2025

Easy Layout, Endless Possibilities – Team Stamp Along Fun

Last night, our Great Minds Ink Alike team gathered for one of my favorite monthly events—our virtual team meeting! We meet via Zoom once a month to connect, share ideas, chat about Stampin’ Up! business, and most importantly… get crafty together.

Every meeting includes a fun creative element—sometimes it's a demo, other times it’s a mystery stamping challenge or a stamp along project. This month, I designed the stamp along card—and I have to say, it’s one of my favorite kinds of layouts. It looks more detailed than it actually is, which makes it perfect for crafters at any level.

The best part? With just a quick change of Designer Series Paper, you can give the same layout a totally different look and feel. I made two versions using patterns from the same DSP pack, Floral Impressions, and I love how unique each one turned out. 


If you’re a demonstrator looking for a creative and supportive community—or just someone who loves to stamp and connect with others—I’d love to tell you more about our group. We’re a fun, friendly bunch, and we truly believe that great minds do ink alike.

Tuesday, May 20, 2025

Simple Sourdough Tips: How to Start Without the Overwhelm

Starting your sourdough journey can feel overwhelming. There are so many gadgets, terms, and techniques floating around—but I want to encourage you: you do not need a fancy setup to bake delicious bread. When I got started, I made it work with what I already had in my kitchen, and you can too!

Here are some of my favorite beginner tips, including what’s actually important and what you can skip (at least for now). I hope this helps you feel confident as you dive into the wonderful (and tasty!) world of sourdough. After all, Great Minds BAKE Alike.

You Don’t Need Fancy Tools

When I started, I used a tea towel in a serving bowl to proof my dough. It worked just fine! These days I use a banneton basket, which gives the loaf a more structured shape and those classic ridges—but it’s not essential. For your starter, any clean glass jar will do. I started with a recycled jar from my pantry. Now I use a wide-mouth pint jar because it’s easier to feed and clean, but use whatever you have!

Yes, You Can Bake Without a Dutch Oven

A cast-iron Dutch oven is a traditional go-to for sourdough baking because it traps steam, helping create a beautiful crust. I still use one, but I’ve also made great loaves in a regular loaf pan. Don’t let the lack of a Dutch oven stop you. There are lots of workarounds.

Use the Right Flour and Water

Two things do matter:

  • Unbleached flour – I use both all-purpose and bread flour, depending on what I have on hand.

  • Filtered water – I just use water from my Brita pitcher, but bottled water works too. Whatever you choose, make sure it’s room temperature. If mine is cold from the fridge, I microwave it for a few seconds.

Temperature Makes a Big Difference

Sourdough is all about fermentation—and wild yeast loves a cozy environment. If your dough is too cold, it will rise slowly (or not much at all). If it’s too hot, fermentation can move too fast or stress the yeast. During warmer, more humid months, everything speeds up. I’ve learned to adjust my proofing times and check the dough more often.

Use a Glass Bowl and Trust Your Senses

I like to use a glass bowl when fermenting my dough so I can watch the rise and look for bubbles along the sides. A little visual tip: if your dough jiggles like Jell-O, it’s likely ready for shaping. There’s definitely science behind all of this—but I often just go by feel. You’ll get better at reading the signs over time.

I also didn’t have a digital thermometer when I started, but it’s one tool I do recommend adding eventually. It helps ensure your bread is baked all the way through. I aim for an internal temp of about 205°F. Before using one, I sometimes overbaked out of caution.

Follow Other Bakers for Inspiration

One thing that’s helped me learn and stay inspired is following sourdough bakers on Instagram. I’ve picked up great tips, techniques, and ideas for flavor combinations just from watching Reels or reading comments. It’s also encouraging to see that no two loaves look exactly alike—and that’s okay!

Sourdough Discard is Gold!

Once you’re feeding your starter regularly, you’ll end up with discard—and trust me, you don’t want to waste it. There are so many great recipes that call for discard. Two of my favorites?

  • Sourdough bagels – I haven’t made traditional bagels with a full sourdough rise yet, but discard bagels are easy and delicious. Just like bread, you can flavor them any way you want—cheddar and jalapeño, cinnamon raisin, everything seasoning… the possibilities are endless!

  • Sourdough crackers – These are so addicting! You can add herbs, cheese, or just sea salt. They bake up crispy and flavorful, and they make the whole house smell amazing. Plus, they’re a fun way to use up discard without needing to plan hours ahead.

Experiment with Flavors

A plain sourdough loaf is still my favorite—but once you get the basics down, try some fun inclusions! Just mix them in gently when you’re shaping the dough. Some of my favorites:

  • Lemon + white chocolate

  • Apple, cinnamon & caramel

  • Cheddar + green olives (or green chiles)

  • Cinnamon raisin

  • Lemon blueberry

There are specific recipes out there for each of these, but honestly, you can often just start with your go-to recipe and improvise.


Final Thoughts: Keep It Simple, Enjoy the Process

Whether you’re baking in a loaf pan or a Dutch oven, shaping in a serving bowl or a banneton, the most important thing is this: just start. Every loaf teaches you something new. Trust your senses, keep experimenting, and most of all—have fun. Even when the bread isn’t perfect—or even pretty—it’s still mighty tasty. There’s something so satisfying about making things from scratch and sharing them with others—whether it’s a warm loaf of sourdough or a hand-stamped card. Just like I say in my craft room: Great Minds Ink Alike… and I think they bake alike, too!

Optional Starter Tool List for Beginners

Want a quick recap? Here’s what I’d recommend for getting started (most of which you probably already have!):

  • Glass jar for your starter (recycled is fine!)

  • Glass bowl for watching your dough rise

  • Tea towel or clean cloth for covering dough

  • Dutch oven or loaf pan

  • Unbleached flour (all-purpose or bread flour)

  • Filtered water (Brita or bottled, room temp)

  • Parchment paper – I used this to transfer dough in and out of the Dutch oven when I was starting out

  • Silicone sling – I use these now instead of parchment and love how easy they make it to lift the loaf in and out

  • Digital thermometer (nice to have, but not essential)

  • Silicone spatula or wooden spoon

Bonus: I now have two Dutch ovens so I can bake two loaves at once—perfect for sharing or stocking the freezer!

Ready to try baking your first loaf? Check out this post for the exact recipe I started with—it’s still my go-to base for all the delicious variations I make now.

Monday, May 12, 2025

May 2025 INK and Go Kit – 5-Minute Cards Made Easy!


Spring is in full swing, and I’ve packed this month’s INK and Go Kit with fresh florals, and cheerful colors that make it a joy to craft! Whether you're brand-new to stamping or a seasoned card maker, this kit is designed to help you create quick, beautiful cards.

If you've got 5 minutes, you’ve got time to make a card!


💌 What’s Inside:

  • Pre-cut cardstock, die cuts, and Designer Series Paper

  • Supplies to make 8 cards total (2 each of 4 designs)

  • Envelopes for your finished cards

  • A handy tip sheet with suggestions for ink colors and stamp greetings

All you need to add is:

  • Ink

  • Sentiment stamps

  • Adhesive and scissors


✨ Why You’ll Love This Kit

  • It’s fast – each card takes 5 minutes or less to assemble

  • It’s simple – no cutting or measuring

  • It’s flexible – swap in any greetings or colors you already have

  • It’s fun – you’ll love the cheerful designs and fresh spring flair

Perfect for happy mail, birthdays, or everyday encouragement!


🛒 How to Order

Grab your May INK and Go Kit while supplies last!

  • $20 – Porch Pickup (local to me)

  • $25 – Shipped anywhere in the U.S.

👉 Click here to order your kit on Payhip


Thanks for stamping with me and making time to share a little sunshine in someone’s mailbox. Every day is a good day to send a card!


Monday, March 31, 2025

Double Z-Fold Card with Storybook Memories DSP

Have you ever made a Double Z-Fold Card? This fun fold is one of my favorites because it has a unique shape that makes it extra special, yet it still fits perfectly into a standard envelope!

For this card, I used the Storybook Memories Designer Series Paper—and let me tell you, the coordinating die-cut sheet made it so easy! That adorable little squirrel, the butterfly, and even the strawberries inside the card? No fussy cutting required! Just pop them out, add them to your card, and you’ve got a sweet, whimsical design in no time.

Why You'll Love This Card Design

Eye-catching fold – The double Z-fold adds an interactive element without being complicated.
Easy assembly – The pre-printed die-cuts make decorating effortless.
Storybook charm – The soft colors and nostalgic illustrations give this card a heartwarming feel.

If you like this card, you’ll LOVE the Storybook Friends Tutorial Bundle! It features 12 exclusive designs created by me and 11 other talented Stampin’ Up! demonstrators.

🛍️ Get the Storybook Friends Tutorial Bundle:

  • Purchase it directly here

  • OR place a $60+ order today, and I’ll send it to you as a free gift!

📏 Want to try making a double Z-fold card yourself? Let me know, and I’ll send you the measurements!

This special tutorial offer ends tonight! Don’t miss out!


Sunday, March 30, 2025

Great Minds BAKE Alike: From Stamps to Starters

Last November, I was chatting with my friend at school about bread, and I mentioned that I had been on a sourdough kick lately. She asked if I had ever made any, and when I told her no but that I’d like to someday, she surprised me by bringing me a starter the very next day. And just like that, a new hobby was born.

I really had no idea what to do at first. We talked almost daily about techniques and shared recipes, and that winter, I settled into a routine.

On Friday night before bed, I would feed my starter. By Saturday morning, if all went well, the starter would be at its peak, ready for me to mix up my dough. For the next few hours, I had to be available to perform a stretch and fold every 30 minutes. But after that, the dough needed to bulk ferment for several hours, giving me plenty of time to go about my day.

If everything went according to plan, I’d shape the dough into a boule (a round loaf) and let it cold ferment in the refrigerator overnight. Then, on Sunday morning, I’d get up and bake it—that’s how Sourdough Sunday came to be! I was so proud of my first loaf that I posted a picture on my Facebook page. And I’ve been posting every Sunday ever since.

Sourdough has a reputation for being difficult and time-consuming, but in reality, it’s all about trial and error—learning your dough and adjusting as needed. When I was first starting out, I especially loved long weekends because they gave me time to experiment. I would often bake two or three loaves, trying different flavors and techniques.

Now that I feel more confident, I don’t bake as much, but I still love a fresh loaf of bread and can't tell you the last time I bought bread at the grocery store.


When I started, my friend gave me a simple, reliable recipe from Little Spoon Farm, and I’m still using it. I often experiment by adding different inclusions, but I still love a classic, plain sourdough! And of course, I’ve also branched out into bagels, crackers, focaccia, dinner rolls, pancakes, blondies… you name it!

Sourdough is a lot like stamping. It takes time, practice, and a little bit of creativity. Whether I’m mixing up a new dough or designing a handmade card, I love the process of experimenting, learning, and sharing my creations with others. There’s something special about making things with your own hands—whether it’s a loaf of bread or a heartfelt card!

And if you’re local, I’d love to stamp or scrapbook with you—and I’d be happy to share my starter too!


Friday, March 28, 2025

A Touch of Spring: My Forsythia-Inspired Swap Card

One of my favorite things about being part of a stamping community is swapping cards! My team recently did a swap, and it was so much fun to see everyone’s creativity come to life. Our long-distance team members mailed in their swaps, while the local stampers and I got together to trade them in person. There’s something so inspiring about seeing the different styles, techniques, and ideas everyone brings to the table!

For my swap card, I designed a bright and cheerful spring card using the Delightful Wishes bundle and Floral Delight Designer Series Paper. I wanted to capture the beauty of forsythia blooms, which always remind me of home. I grew up with a forsythia bush in my backyard, and in my current house, I loved my neighbor’s forsythia for years—until they cut it down! I’m seriously considering planting one of my own because nothing says "spring is here" quite like those
yellow blossoms.

Swapping cards is such a great way to get fresh inspiration, connect with other stampers, and add some gorgeous new designs to your collection. Have you ever participated in a card swap? I’d love to hear about your experience!

Thursday, March 27, 2025

Quilting Meets Crafting: A Special Way to Thank Our Veterans

What if a simple handmade card could brighten a Veteran’s day? This weekend, we’re making that happen.

This Saturday, I’m happy to be a vendor at the Scrapbooking Crop at the VFW in Jacksonville, an event that brings together creativity and community while supporting a great cause.

In addition to raising awareness and support for Veterans with PTSD through ThisAbleVet (TAV), attendees were invited to design quilt-inspired thank-you cards for Quilts of Valor, an organization that gifts handmade quilts to Veterans.

I wanted to contribute in my own way, so I created a quilt card make-and-take. Attendees can stop by my table, craft a card, and add their own special touch to this heartfelt collection. Whether you’re an experienced crafter or just love a creative moment, this is a simple way to show appreciation to those who have served.

If you’re attending, I’d love for you to stop by, say hi, and make a card with me. And if you can’t make it but still want to contribute, consider donating a quilt-inspired card to help honor our Veterans. Every handmade touch matters. 💙


Saturday, March 1, 2025

Exclusive Storybook Friends Digital Download – Watch, Learn and Create!

Unlock Your Creativity with the Storybook Friends Digital Download!

Are you ready to take your paper crafting to the next level? I am excited to share a special collaboration that I’ve been working on with 11 other talented demonstrators—and it’s finally here! 

Introducing the Creative Stamping Collective’s Exclusive Digital Download featuring the Storybook Friends Bundle! This collection is packed with inspiration, techniques, and step-by-step guidance to help you create beautiful projects with ease.

What’s Inside This Exclusive Digital Download?

When you grab this must-have crafting resource, you’ll receive: 

12 PDF tutorials with instructions
- 12 exclusive videos where you can follow along step-by-step 
- Creative inspiration from some amazing demonstrators

Whether you’re a beginner or an experienced crafter, this collection is designed to help you explore new techniques and bring the charm of Storybook Friends to life in your own creations.

Why You’ll Love It

I had so much fun designing my project for this month, and I know you’ll love discovering all the different ways to use this adorable suite. From cards to scrapbooking and beyond, the possibilities are endless!

How to Get Yours Today

Get instant access to the digital download for just $15BUY NOW
Or get it FREE with a $60 orderSHOP NOW

Don’t miss out on this chance to watch, learn and create with 12 incredible demonstrators! I can’t wait to see what you make!

Happy crafting!

Monday, February 24, 2025

Scrapbooking Made Simple

Scrapbooking Made Simple: Create Beautiful Layouts with Ease!


Scrapbooking is more than just a craft—it’s a way to preserve and cherish your most precious memories. Whether you're a seasoned scrapbooker or just getting started, the key to making stunning layouts is keeping the process fun, stress-free, and tailored to YOUR unique story.

That’s why I create simple yet customizable layouts that you can adapt to fit your photos, colors, and themes—without spending hours designing from scratch. Let’s make memory-keeping easier and more enjoyable together!

This Week’s Scrapbooking Layout is Perfect for:

✔️ Busy scrapbookers who want quick & beautiful pages ✔️ Beginners looking for guided layouts and inspiration ✔️ Experienced crafters who love fresh, creative ideas.

Join Me for an In-Home Scrapbook Class! If you're local, I’d love for you to join me for my in-home scrapbook class TOMORROW! We’ll be creating this week’s layout together, and I’ll walk you through how to make it your own with personalized touches.

Class Details:

  • The class fee covers all necessary supplies, which you’ll purchase through me.

  • New to Stampin’ Up!? No worries! I’ll help you choose the right supplies to get started and build a collection you can use for future projects.

  • Experienced scrapbooker? You’ll have the option to customize your purchases and select the products that match your personal style.

Can’t Make It In Person? Join My Virtual Scrapbook Club!

I know life gets busy, and not everyone can attend in-person classes. That’s why I offer a Virtual Scrapbook Club, where you’ll receive: ✅ Exclusive layout ideas & inspiration ✅ Step-by-step video tutorials ✅ Personalized guidance to help you create stunning pages

Just like my in-person class, your supply purchase serves as your membership. That way, you’re always equipped with the tools you need to bring your creative vision to life!

Want More Crafting Time? Let’s Talk About an Upcoming Retreat! P.S. If you’d love uninterrupted time to craft and connect with other scrapbookers, let me know if you’d like more details about the scrapbooking retreat I’ll be attending in Jacksonville at the end of next month. It’s a fantastic way to support a great cause while diving deep into your projects with fellow crafters!

Drop a comment or DM me for more details. Let’s make scrapbooking simple, stress-free, and beautiful—together!

#ScrapbookWithMe #SimpleScrapbooking #MemoryKeepingMadeEasy


The Magic of a Terrific Toadstools Gatefold Card


There’s something truly special about a handmade card that surprises and delights the recipient. Enter the Terrific Toadstools Gatefold Card—a design that brings a little fun, whimsy, and an extra layer of excitement to card-making.

A gatefold card is more than just a greeting—it’s an experience. Unlike a traditional card, this design opens in a unique way, creating a moment of curiosity and anticipation. And when paired with the charming Terrific Toadstools theme, it transforms into a whimsical little escape into nature.

The gatefold mechanism adds an unexpected twist, making the act of opening the card part of the fun. If you’re looking to add a little enchantment to your next handmade card, a gatefold design might be just the thing. The combination of surprise and charm makes it a memorable keepsake for the recipient.

Have you tried making gatefold cards before? Let’s chat in the comments!


Wednesday, February 19, 2025

The Power of Handmade Cards: A Simple Gesture with a Big Impact!

In a world of digital messages, nothing beats the joy of receiving a handmade card. This past week, I was reminded just how powerful this small act can be when I received FOUR beautiful handmade cards!

✨ One had a little goof—opening at the bottom which gave me an extra smile!
✨ Another was a Valentine’s card that got lost in the mail and arrived late, but still so much fun to open!
✨ The other two were fun, unexpected surprises that made my day.

Handmade cards don’t have to be perfect to be meaningful—in fact, those little imperfections are part of their charm. They are tangible reminders that someone took the time to create something just for you. Thanks, Meg, Amy and Jim for the happy mail!

If you love crafting, why not send out a card this week? A thank-you, a “just because,” or a little encouragement—it might be exactly what someone needs.

Have you received or sent a handmade card recently?  

Monday, February 17, 2025

Heart Shaped Bundle for Every Occasion


A Versatile Heart Shaped Bundle for Every Occasion

I’m absolutely loving the Heart Shaped Bundle, and I have to say—this set is way more versatile than you might think! While hearts are often associated with Valentine’s Day, this design proves that they can be used for so much more. 💚

For this card, I combined Granny Apple Green and Melon Mambo to create something perfect for birthdays, anniversaries, or simply sending a sweet note to someone special. The intricate heart frame adds just the right touch of elegance, while the bold pop of color makes the greeting stand out beautifully.

Don’t Miss Out—Limited Time Only!

The best part? The Heart Shaped Bundle is a FREE Sale-A-Bration option! That means you can earn it as a gift with purchase, but only for a limited time—once Sale-A-Bration ends, it will be gone for good. If you love it as much as I do, don’t wait!

Get Yours Before It’s Gone!

How to Grab This Freebie:
1️⃣ Shop now and earn this bundle free with a qualifying order.
2️⃣ Add your favorite crafting essentials to your cart before Sale-A-Bration ends.

What occasion would you use this bundle for? Let me know in the comments!


Saturday, February 15, 2025

How My Monthly To-Go Card Kits Were Born (And Why You'll Love Them!)


When the world shut down in 2020, I created To-Go Kits to help my customers keep stamping and making cards, even with limited supplies at home. These kits became a way to stay creative and spread joy through happy mail when we needed it most. As in-person gatherings returned, the love for my to-go kits remained strong. People enjoy crafting on their own time, at their own pace, with minimal supplies—so I continue to create unique kits each month!

What Are the Monthly To-Go Card Kits? 

1. What is included in the kit?

Each kit includes:

  • Pre-cut materials for 8 handmade cards (4 designs, 2 of each)
  • tip sheet with assembly guidance, ink color suggestions, and sentiment set info
  • Envelopes for all cards
  • Any embellishments and ribbons

2. Do I need to provide anything?

Yes, you’ll need to have:

  • sentiment stamp (any similar greeting stamp you have will work!)
  • Ink & adhesive (including Dimentionals)
  • Occasionally, a paper trimmer or scissors

3. How much does it cost?

  • $20 for local pick-up
  • $25 for kits shipped to your door

4. When are the kits available?

  • Samples are shared early each month for preview & reservations
  • Kits are available for pick-up or mailing around the 15th of the month

5. Do the kits include pre-stamped images?

Due to company policy, I cannot pre-stamp any images. However, all cards are designed to use only sentiment stamps, so you can use any greeting stamps you have!

6. How do I reserve my kit?

To reserve your kit, send me a message or comment on my monthly post, and I’ll confirm your order!

7. Can I order multiple kits?

Absolutely! Just let me know how many you’d like when reserving your kit, and we can adjust shipping fees if they will be mailed.

8. Do you offer virtual support?

Yes! I’m happy to answer questions if you need help assembling your cards. Feel free to message me anytime!

Why You’ll Love These Kits

  • Convenience: No need to design, cut, or prep—just assemble and enjoy!
  • Creativity Without Clutter: Work at your own pace with minimal supplies.
  • Perfect for All Skill Levels: Whether you’re new to card making or a seasoned pro, these kits make it simple.
  • Happy Mail Ready: Keep a stash of handmade cards ready to send to friends and family!

How to Order

Want to join in the fun? Each month, I release a new kit available for pick-up or shipping. Comment below or message me to reserve yours!

Monday, February 10, 2025

February To Go Kits: Creativity Made Simple!


Love card making but short on time? My February To-Go Kits are the perfect solution! Whether you're crafting at your own pace or need an easy, ready-to-assemble set of beautiful cards, this kit has you covered.

What's Included?
✔️ Pre-cut supplies to create two each of four unique card designs
✔️ Coordinating envelopes for a polished, ready-to-send finish
✔️ A tip sheet with helpful assembly guidance

What You’ll Need:
Simply provide your own greeting stamp, ink, and adhesive—everything else is ready for you!

Cost & Delivery Options:
$20 for porch pickup
$25 shipped directly to you


Pickup & Shipping Details:
📅 Kits will be ready for porch pickup or mailing by February 15th
📩 Let me know if you’d like one, and I’ll have it ready for you!

Don’t miss out—secure your kit today and enjoy a fun, stress-free crafting experience!


Create a Stunning Butterfly Card in Minutes!


There’s something magical about butterflies, and the new Beautiful Butterflies bundle makes creating stunning, elegant cards a breeze! Whether you’re celebrating National Learn About Butterflies Day on March 14 or simply want to brighten someone’s day, this card is perfect for the occasion.

Why You’ll Love This Card

  • Hybrid Embossing & Die-Cutting in One Step! The Beautiful Butterflies hybrid embossing folder allows you to emboss and die-cut simultaneously, saving time without sacrificing beauty.

  • Quick & Simple Assembly. This card comes together in just minutes, making it ideal for busy crafters.

  • Gorgeous Free Paper! I used the Sale-a-Bration Bloom Impressions Designer Series Paper—because who doesn’t love a freebie? Paired with Petunia Pop and Blackberry Bliss cardstock, this color combo is a showstopper!

Supplies Needed:

  • Beautiful Butterflies Bundle (stamp set, dies, and hybrid embossing folder)

  • Bloom Impressions Sale-a-Bration DSP (or any coordinating patterned paper)

  • Petunia Pop, Blackberry Bliss and Basic White cardstock

  • Petunia Pop ink & sentiment stamp from Beautiful Butterflies

  • Purple Adhesive Backed Sequence from the Sale-a-Bration catalog

When to Send It?

While this card is a great fit for National Learn About Butterflies Day (March 14), any day is a great day to send a little joy! Whether for birthdays, encouragement, or just because, this butterfly card is sure to bring a smile.

I’m popping this one in the mail this week—who will you send yours to?

Let’s Stay Connected! Are you on my mailing list? I just sent out my February calendar filled with fun wacky holidays and matching card ideas! If you don’t want to miss the next one, sign up today!

Happy crafting!

Related Posts with Thumbnails
 
Pin It button on image hover