I planned to do a tissue holder sometime this cold and flu season with my stamp club. So when I came across this idea on Pinterest, the search was over. Babs has a link on her blog to You Tube directions by Dee. If you line it up carefully when putting together, it will fold down and store flat and could fit in a care package.
Showing posts with label 3-D project. Show all posts
Showing posts with label 3-D project. Show all posts
Monday, January 21, 2013
Saturday, January 5, 2013
Snowflake Mittens
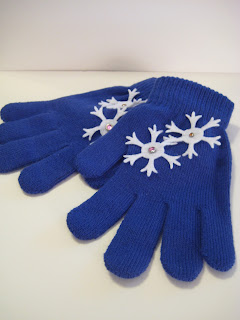
I was so excited to make these gloves using the Snow Flurry Bigz Die from the holiday catalog. My friend, Malissa Beer, made a pair several years ago with a snowflake die from the Stampin' Up catalog. So when I saw this new die, I knew I wanted to make a few pairs.
Thursday, November 8, 2012
Christmas Bag-a-lope
 When I first started stamping, I learned to use an envelope to make a small little bag. It never occurred to me until recently (thanks M.E.) that if you used a big envelope, you would get a bigger bag. So I went to the store for the white, large mailing envelopes, and it didn't occur to me until I got home and started in that I shouldn't have bought envelopes with the blue security print on the inside. To make the envelope, cut the top off and score the remaining three sides. Then stick you hand in the bag and gently work the corner into a gusset and score lines into the bag shape. Now there's no need to buy gift bags again!
 To Order Stampin' Up! Products On-Line 24/7, CLICK HERE!
Monday, October 1, 2012
Sunflower Card
 Isn't this a beautiful card? My talented friend, Mary Ellen, designed this as one of her swaps for convention. I did some tweaking so that I could use supplies I had on hand and did my best to recreate her work. You can see hers here.
 Monday, April 23, 2012
Petite Purses
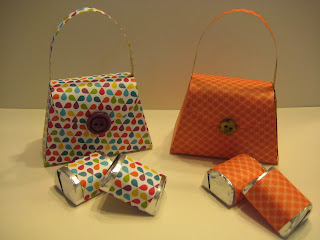
Aren't these Petite Purses cute? The Big Shot die and designer series paper are part of the Summer Smooches suite that is available in April before the new catalog June 1.
 The purses go together pretty easily which would make them great for party favors. We made these in club last week and covered some Hershey Nuggets with our paper scraps to tuck inside.
 Tuesday, December 27, 2011
Telescoping Snowman
I saw a fantastic telescoping snowman at convention this summer. But when I went to make one, I didn't have the right sized circle punches and dies. So when my finished snowman ended up a little too small, I decided to put it on a card. I loved the way it turned out.


Friday, July 29, 2011
Personalized Gum Wrapper
It's been a week since my last post - yikes! And the funny thing is I have been stamping the whole time so I should have lots to share with you. I spent the last week stamping with 2nd and 3rd graders at College for Kids. It was a lot of fun, but just like my classes at school, they kept me on my toes. We created at least 2 cards every day (no small feat in an hour!) using techniques and tools I thought the kids would like. I even worked up the courage to use the shaving cream technique with them on the last day. I will post some pictures of our projects next week. I also had a Christmas in July Stamp-a-Stack so you can be watching for those cards too! In the meantime, here is another little treat for my convention roommates that matches their other gift. I decided to make one for myself because there was no reason I shouldn't be carrying cute gum around too!
To Order Stampin' Up! Products On-Line 24/7, CLICK HERE!
To Order Stampin' Up! Products On-Line 24/7, CLICK HERE!
Wednesday, April 20, 2011
Petal Cone Carrot
 And you thought you could live without this die? There are so many clever people out there coming up with some cute ways to use this die. I saw this at a recent stamping event and had to come home and try one of my own. Now all it needs are a few little candies and I am ready for the Easter Bunny!
To Order Stampin' Up! Products On-Line 24/7, CLICK HERE!
Monday, April 18, 2011
Petal Cone Takeout Chocolate Boxes
Hard to believe this cute little takeout box is made from the Petal Cone Die from the Occasions Mini Catalog isn't it? That adds a whole new world of possibilities for that die.
Sunday, March 20, 2011
Recycling At Its Best

 Who wouldn't like to sink their teeth into this to do list? We made these jars in stamp club and used one of my favorite sets from the Occasions Mini catalog, Eat Chocolate. Simply remove the label from a Starbucks Frappuccino Coffe Drink bottle. Attach your stamped label with Sticky Strip and decorate the lid. If you go with a pink and brown theme like this jar, there's no need to do anything but cover the top of the lid. If you have a different color scheme, you might want to run a piece of grosgrain ribbon around to cover the edge of the lid. Fill it with candy and you have an instant treat container!
Thursday, February 24, 2011
For You Sliding Pop-up Card
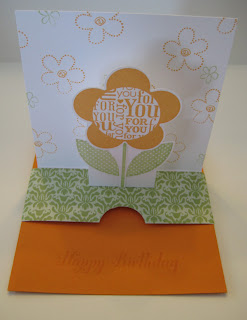
I saw this idea on Splitcoaststampers.com and knew I needed to make one. Like everything else, once you make one, it is pretty easy to make more. We did this version at our last stamp club. Here it is flat:
Here it is open:
Here's the link to directions at Splitcoast: http://www.splitcoaststampers.com/resources/tutorials/slidingpopupcard/
To Order Stampin' Up! Products On-Line 24/7, CLICK HERE!
Here it is open:
Here's the link to directions at Splitcoast: http://www.splitcoaststampers.com/resources/tutorials/slidingpopupcard/
To Order Stampin' Up! Products On-Line 24/7, CLICK HERE!
Wednesday, January 26, 2011
Tealights
 Aren't these cute? You can use the same technique for stamping on candles on tealights. Stamp your image on tissue paper and color. I used marker here but have also used colored pencils. Cut the image, and if you use a shape that works in our punches, it's as easy as can be. For a tealight you need to use a hole punch to make room for the wick. It's a big help to punch the tissue on a piece of scratch paper so that the tissue doesn't tear.
 Place the tissue on the candle and heat with a heat tool to "melt" the tissue into the wax. It is really still there, but the wax of the candle melts around it. If you were doing a candle, you could hold it on securely while you heat it with wax paper.
I have been planning for a few months to do a tealight with stamp club sometime soon. And then in my latest APEX swap organized by my upline, I got one of these from another talented demo in our group.... great minds do "ink" alike!
Monday, January 24, 2011
Snowflake Favor Box
 As much as I would like to be done with snow, that isn't such a realistic thought. If you can't beat them, join them! So here's a Fancy Favor Box with a little embossing. After cutting the favor box, run it through the Big Shot with the Northern Flurry embossing folder, changing the position of the folder each time. I think I ran it through 4 times. Then punch the hole using the 1 3/4 circle punch and cover it with a window sheet and fill with some wonderful goodies.
 Friday, January 14, 2011
Valentine Diorama Card
I first made one of these "diorama" cards at my friend's (Julie Davison) Stampin' Up! meeting, and it has only taken me a couple of years to make another one. In fact, I have made a few - you may remember my posting a similar card a couple of months ago for Rae Anne's baby shower. This particular card was for stamp club this month, and I did a similar version for a Valentine swap that I was in with other demonstrators.
Start with an 8 x 8 square of cardstock. Here's the card showing the back side.
And here is an inside view.
Apply some adhesive in the corner...
**I was rereading my finished post and realized I didn't take a picture of the card after putting the two pieces together....and I was so pleased with myself that I took all of these pictures. Oops! So for now, I will tell you that piece with the two hearts pulls over and sticks to the Sticky Strip at the top which allows the card to close. But when it is open, it is a 3 sided card and forms a "corner". **
Flip it over and add the ribbon...
Tuesday, December 7, 2010
Christmas Treat Boxes
 After making several of these Halloween treat containers with the Candy Wrapper Bigz Die, it seemed to be an easy switch to Christmas. I used the Northern Flurry Textured Impressions Embossing Folder from the holiday mini catalog. You can see the seam of the box at the top - that's because I wanted to put my Merry Christmas scallop on the side with the fewest snowflakes. Although the ribbon isn't necessary to keep the box closed, I think it adds some color and keeps the recipient from peeking!
Thursday, November 18, 2010
No More Store Bought Gift Bows
 The tutorial for this came from Splitcoaststampers under paper bows and is a fun way to personalize gifts using your favorite Designer Series Paper. Since all the Designer Series Papers coordinate so nicely, you could even use scraps! We made these in stamp club last week. I pulled out all of my old DSP, and it was fun to see all of the color schemes and neat bows everyone created.
 Saturday, September 11, 2010
Spooky Treat Box
With a few folds and twists, this this spider web becomes a cute little Halloween treat box:
I used the new Candy Wrapper Bigz L Die and Spider Web Impressions Embossing Folder to make this quick little treat box. I usually give my second graders pencils and teachery gifts for Halloween, but this is pretty tempting for this stamping teacher! Maybe I will just have to make a few for my special trick-or-treaters.
This box twists up and actually does stay by itself, but I liked the added ribbon with the touch of white along the edge.
This box twists up and actually does stay by itself, but I liked the added ribbon with the touch of white along the edge.
Thursday, June 10, 2010
4th of July Waterfall
My upline, Meg, hosts a quarterly event for downline members who have met certain qualifications. I was fortunate enough to be able to participate and receive "wow" swaps from other very talented demonstrators. The one from Debbie Jones was just perfect for this month's stamp club. It is a waterfall card featuring the July Fourth set from the Summer Mini catalog. If you didn't think you needed this set before, you will now! Here is my version of her awesome card. Thanks Debbie!
Pull the ribbon tab and watch the waterfall!
The great thing about waterfall cards is that they are so impressive but really not that hard to make. You can find a step by step tutorial at Splitcoaststampers.com if you want to try your own.
Supplies: July Fourth stamp set, Night of Navy ink, Real Red, Brilliant Blue, Whisper White cardstock, Navy Grosgrain Ribbon, Eyelet, Brads, Crop-a-Dile
Monday, April 5, 2010
Hidden Message Card
At first glance this is just a small, little birthday card....
But when you open it, there is a left side...
and a right side...
And with a pull on the two outside flaps, it reveals an inside section.
But that's not all...
This center section is hiding a whole new section!
Mine has been handled many times and it is impressive to even the biggest card skeptics! Directions can be found on Jan Tink's blog. While this seems daunting, it isn't too hard to put together, and after the first one, they go together pretty easily! It's been one of my favorite stamp club projects over the years.
Supplies: Real Red, Basic Black, So Saffron, Very Vanilla cardstock, Real Red, So Saffron, Basic Black ink, black grosgrain ribbon, Game Night, On Your Birthday stamp sets, Jackpot Designer Series Paper
Subscribe to:
Posts (Atom)


