Thursday, December 30, 2010

One Last Christmas Card

The problem with sending cards to your stamping friends is that they have all seen of your cards.  This is what I came up with to send to them and give myself one last chance to use my Jolly Saint Nick stamp set.

To Order Stampin' Up! Products On-Line 24/7, CLICK HERE!

Tuesday, December 28, 2010

Christmas Scrapbook Layout

At Gail's request, we are using a layout from her recent Creating Keepsakes Magazine since it is her hostess month for Scrapbook Club.  But the really cool thing about it is that we are using My Digital Studio!  Can you guess where?  I don't own the Bingo stamp set, so I purchased it digitally and printed out the bingo card.  Pretty slick, huh?  Tonight the ladies can customize their bingo card with colors of their choice and make it work for any occasion!  I am looking forward to seeing what they will come up with. 

To Order Stampin' Up! Products On-Line 24/7, CLICK HERE!

Saturday, December 18, 2010

While designing cards for my recent Stamp Club, I knew I wanted to do a pop-up tree.  I wasn't sure what to do for the front, but I really like what I came up with because it doesn't really give much of a hint as to what's inside.
Here's the inside and a close up of the tree after we ran the parts through the Big Shot with an embossing folder.


Thursday, December 16, 2010

Silver on Silver Snowflakes

Silver Embossing Powder on our Brushed Silver cardstock is just beautiful.  This was one of our stamp club projects this week, and though it's pretty simple, I think it is an elegant look. 

Monday, December 13, 2010

Penguin Gel Card

December Stamp Club is tomorrow night!  I tried to make some of the projects Christmas but also projects that could be adapted if the ladies wanted to use them for something else.  I thought this one could be a winter birthday for most anyone.  It features an old technique, but one I have never done with the club before.  If you don't have treat cups but still want to do a snow globe, how about making a gel card?  I used the 1 3/4 circle punch for the hole, attached a cello bag of hair gel and Dazzling Diamonds to the back of the Bashful Blue and adhered it to the top of the Real Red.  Do you recognize the piece I used for the base?   It's the balloon basket from Sweet Centers.   

Saturday, December 11, 2010

Christmas Gift Card Holders

Hang your gift cards on the tree or send them off in an envelope - it's easy to do with your Big Shot and scallop circle die.  Use any Designer Series Paper and stamps to personalize your "ornament".    We'll be making these Tuesday in Stamp Club.  I will give the ladies their choice of paper from the Candy Cane Christmas DSP (although it doesn't show up in the picture, I chose the two papers that had glitter on them for a little extra bling).  Let me know if you would like to join us! 


Thursday, December 9, 2010

Lovely As a Tree Christmas

My mom, my sister and I have two Thanksgiving traditions - we string popcorn and cranberries and we make Christmas cards.  I am happy to report my popcorn and cranberries look great on my Christmas tree.  As far as cards go, I will be sending out some of the cards you've seen in previous posts, but for all of my stamping friends, I still need to create something they've never seen or even worse, made at one of my events.  So I can't brag about being done with my cards, but Mom's and Sara's are done.  Here's the card my mom will be sending out this year.  She used Lovely As a Tree but added just the bird from the main stamp in Scenic Seasons in the background. 

To Order Stampin' Up! Products On-Line 24/7, CLICK HERE!

Tuesday, December 7, 2010

Christmas Treat Boxes

After making several of these Halloween treat containers with the Candy Wrapper Bigz Die, it seemed to be an easy switch to Christmas.  I used the Northern Flurry Textured Impressions Embossing Folder from the holiday mini catalog.  You can see the seam of the box at the top - that's because I wanted to put my Merry Christmas scallop on the side with the fewest snowflakes.  Although the ribbon isn't necessary to keep the box closed, I think it adds some color and keeps the recipient from peeking!
To Order Stampin' Up! Products On-Line 24/7, CLICK HERE!

Saturday, December 4, 2010

Quick Gift Idea

If you read my newsletter (if you haven't, sign up in the sidebar) you have seen this picture already.  It is a quick gift idea that took me a matter of minutes to put together.  I used the Candy Cane Christmas Decor Elements to decorate the appetizer plate and Irish coffee mug and added a little hot cocoa mix.  Add a treat to the plate and it's ready to go.  Or maybe make your own cocoa mix, and put a cello bag of hot chocolate in the mug. 

Thursday, December 2, 2010

Baby Gift Stampin' Up! Style

My friend and fellow stamper, Rae Anne, is expecting a baby in January.  So what better way to celebrate than with Stampin' Up!?  Her sister, Becky and friend, Deana, did an awesome job with the invitations, favors, and table decorations using the Fox and Friends stamp set.  So when I happened across this outfit - I had to buy it since it fit the theme perfectly!  I created the gift bag with Fox and Friends and then made a gift card holder for some Decor Elements money.  I knew Rae Anne was planning to do some decorating in the baby's room, and I wanted to help her get started.  When she posts her finished projects on her blog, I will let you know.  In the meantime, here are some of the party decorations Becky and Deana did.      


Monday, November 29, 2010

Gift Tags

I am all ready to start wrapping gifts now with this set of gift tags, and you can be too!  We are making 30 tags this Friday and Saturday at my stamp-a-stacks. If you are local, please consider joining us - the more the merrier! 


Sunday, November 28, 2010

Bring on Christmas!

After Thanksgiving, it has become a bit of a tradition that my mom, sister and I make Christmas cards.  So instead of shopping, we are busy cutting, punching, and stamping.  The kids even got in on the action this year!  Looks like someone will have a job next year too!

Friday, November 26, 2010

Movers and Shapers Christmas


My upline, Meg, hosts an APEX (A Positive Example) event once a quarter. Those demonstrators in her group that qualify to participate make a "wow" swap. This is my version of a card one of the fabulous demonstrators in our group made for our swap last fall. (I am afraid I don't know who created the original.) There were just too many to do last holiday season!
To make this card, we embossed using the embossing folder and then used the Movers and Shapers die and ornament punch for this layered look. I don't know what I did before my Big Shot!

Tuesday, November 23, 2010

Scrapbook Club Tonight

I took my inspiration for tonight's Scrapbook Club (guests welcome) from the Stampin' Up! Idea Book and Catalog.  I loved the bright colors and the Circle Circus together.  After I tweaked the sample from the catalog, I created a second page to complete the layout.  Then I broke out my paper piercer and white gel pen for the faux stitching on the side and bottom edges.  Now all I need to do is add the pictures!

Saturday, November 20, 2010

Loads of Gifts!

One of the fun things about my Stampin' Up! family is that we have lots of opportunities to swap cards and projects with each other.  This is my version of a card I received last year from my friend, Shirley Casey.  With all of the accessories in the Loads of Love and Loads of Love Accessories stamp sets, you could come up with all sorts of surprises for that truck bed for any season.


To Order Stampin' Up! Products On-Line 24/7, CLICK HERE!

Thursday, November 18, 2010

No More Store Bought Gift Bows

The tutorial for this came from Splitcoaststampers under paper bows and is a fun way to personalize gifts using your favorite Designer Series Paper.  Since all the Designer Series Papers coordinate so nicely, you could even use scraps!  We made these in stamp club last week.  I pulled out all of my old DSP, and it was fun to see all of the color schemes and neat bows everyone created. 

Tuesday, November 16, 2010

Glittery Trees


This one is another quick card we did at my last stamp-a-stack. I added the layer of red, but it is pretty striking with just the white too. And though you can't really see it in the photo, we added Shimmer Paint by mixing it with alcohol in a spray bottle and spritzing the whole card. The beauty of stamping with this set is that everything you see here, is on one single stamp. Just lift the Wild Wasabi color off of the bird with a blender pen and then color it with a Real Red marker. And for some added sparkle, a little 2 way glue and Dazzling Diamonds for the snow.


Monday, November 15, 2010

Fantastic Offer - Do What I Do!

If you have ever thought about becoming a Stampin' Up! demonstrator, now is the time!  Starting today through November 30, you can purchase the starter kit for 50% off!  The Standard Starter Kit is normally $175 and is now $87.50 with free shipping!  It is over $310 in value and is customizable.  Whether you are considering it as an opportunity to earn some extra money or you're just interested in the discount for yourself, this is too good to miss.  Visit my website for more information or feel free to contact me.  Ready to sign up now?  My password is rachelchamberlain. 

To Order Stampin' Up! Products On-Line 24/7, CLICK HERE!

Sunday, November 14, 2010

One More Medallion Card

I am seeing my sister today, so here is my last medallion card for awhile.  I think we used it three months in a row in stamp club, but it is such a great stamp with so many possibilities that I couldn't help myself.  I know Sara will let me borrow it again anytime, but it's only fair to give her back her stamp.  Click here and here to see the other techniques we did with this stamp.  

This card was so easy to make and turns out great every time.  Emboss the medallion with clear embossing powder.  Then sponge colors of ink over it.  I started with Night of Navy, then used Pacific Point and moved to Bashful Blue last.  By using the lightest color last, I could fill in any areas missing color and even things out.  If you stamp the medallion on a scratch piece of cardstock and cut out the center, you have a template to keep the outside of the image neat.  (Some of my careful stampers went without the template.)  I think this technique was first demonstrated at a Stampin' Up! event (that I didn't attend) a couple of years ago.  But that is one of the many great things about stampers, everyone is so eager to share new ideas, and I am sure someone demonstrated this at a meeting I attended. 


To Order Stampin' Up! Products On-Line 24/7, CLICK HERE!

Saturday, November 13, 2010

Quick Santa Card

This was a quick card I made as I was designing stamp-a-stack cards for last week.  It didn't make the cut, but I do like it and will plan to make a few more for the holidays.  I used the new Jolly Jingles jumbo wheel and added a belt.  I was using up scraps so the gold is not Stampin' Up!  And here's a tip:  cut a square of gold slightly bigger than the belt and then cut a square of black the same size as the strip of black....  voila, faux buckle!

To Order Stampin' Up! Products On-Line 24/7, CLICK HERE!

Thursday, November 11, 2010

Season's Greetings

They gave us this stamp set in Salt Lake City (with an ink pad, glass glitter and Designer Series Paper) at the very, very end of convention.  Imagine a room full of women who love stamping being given a last minute surprise gift of stamps!  The room went crazy!  And of course right after that, we began thinking about how we could use it this holiday season.  It has the best greetings.  They are big and ornate and can be a nice focal point of a card.  I look forward to using it again, but this card was for last week's stamp-a-stack.  We also tried out the 1/2" seam binding. 
To Order Stampin' Up! Products On-Line 24/7, CLICK HERE!

Tuesday, November 9, 2010

Tags Til Christmas Card

Here's a great way to kill two birds with one stone - make tags and your Christmas cards with the same set!  This ornament comes from the Tags Til Christmas stamp set and can double as a focal point on a card or scrapbook page.  I added some of our 1/8" taffeta ribbon with a glue dot and a silver greeting.  Quick and easy. 
To Order Stampin' Up! Products On-Line 24/7, CLICK HERE!

Sunday, November 7, 2010

Frosty Flurries

Here is one of the cards we did Friday and Saturday at my Christmas Stamp-a-Stacks. I have discovered that I tend to gravitate to blue and red combinations for snowy or snowman cards. But this year, with our new colors, I could use Baja Breeze to mix it up a little. This little snowman come from the Jolly Old Saint Nick set in the current mini catalog. I fell in love with the Santa in that set, but there are other great stamps in it too! We also used the Northern Flurry Impressions Embossing Folder for the background. Some of the ladies even ran their envelopes through the Big Shot to create snowflakey envelopes.  Then we finished it with the Merry Christmas from Teeny Tiny Wishes and the Word Window punch. 


To Order Stampin' Up! Products On-Line 24/7, CLICK HERE!

Thursday, November 4, 2010

Decor Elements

Have you ever looked at the Decor Elements vinyl images and thought, "Yeah they are cute, but what can I do with them?"  Well here's a quick option.  The Candy Cane Christmas set of 10 can be cut and used on a variety of projects.  This $1 plate from IKEA makes a quick hostess gift or plate for baked gifts this Christmas.  There are 10 images on the sheet, so be checking back for my next project!

To Order Stampin' Up! Products On-Line 24/7, CLICK HERE!

Tuesday, November 2, 2010

Gift Tags

Need a little something for a gift in the next couple of months?  What about a packet of handmade gift tags?  The Tags Til Christmas set in the mini catalog is perfect for making a cute little gift packet and then some tags for yourself to us.  I put a dozen in a cello bag and used the Top Note die to finish the packet off.  Quick and easy!
To Order Stampin' Up! Products On-Line 24/7, CLICK HERE!

Saturday, October 30, 2010

Scrapbook Club

Sorry for the lack of posts lately.  I was finishing up report cards, getting ready for parent/teacher conferences and then decided this would be a good time to be sick.  I missed an entire week of school and parent/teacher conferences!  I even had a couple things ready for posting, but that just wasn't going to happen last week.  So be looking this week for a couple of new ideas.  They are beginning to look a lot like Christmas!

Thanks to all of my scrapbook club ladies for understanding.  This will be the layout we will be doing on our rescheduled night this week.  It features Jolly Old Saint Nicholas and the new Tasteful Trim Big Shot die. 

Sunday, October 24, 2010

A New Twist on the Owl Punch

This card may look familiar to you.  I just switched out the bat punch on the spinner for an owl punch.  Punch an owl from white, cut the feet off and you've got a ghost!
To Order Stampin' Up! Products On-Line 24/7, CLICK HERE!

Tuesday, October 19, 2010

Acrylic Blocks as Stamps???

Here's a project that uses 2 rubber stamps and 1 acrylic block... like a stamp! Ink your plain acrylic block in your stamp pad as if you had a stamp on it, and voila... you have a weathered looking background. At stamp club, we found if you rubbed and stamped the block on the pad you can get a more solid image if that's more your style. Think of the possibilities if you have all of the different sized blocks!


Then finish this card off with a couple of stamps and a ribbon. I wanted a slightly different look with the ribbon so I ran Snail adhesive along the back of the satin ribbon which helped my little "flaps" stay put.

Saturday, October 16, 2010

Another Spooky Spider Web Treat Holder

Here's another quick treat holder for Halloween.  This one obviously works best with longer treats, but it's another chance to use the Spooky Spider Web Embossing Folder. 

I wanted a little more contrast on the black cardstock so I inked my embossing folder up with White Craft ink (using a brayer) before I put the cardstock in and sent it through the Big Shot.  This is the same technique I used on this card several months ago.  I used the scallop square die, punched a hole at the top and tied it shut to create this "Halloween taco".  You might recognize the Eek You're Sweet from the center of a stamp in the Sweet Centers set. 

Tuesday, October 12, 2010

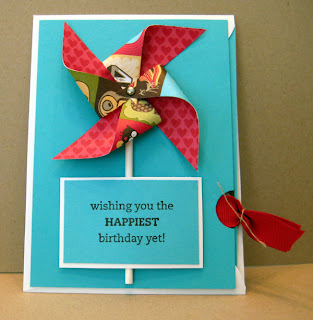
Happy Birthday Pinwheel

This is another Stamp Club project we will be doing tonight.  I saw a card like this demonstrated at our convention this summer and was looking forward to making one.  I bought the sucker sticks for this project and will have over 100 leftover to make cake pops.  Don't be looking for them at my next event, but they sure look cute! 

I cut a 3 x 3 square of Play Date Designer Series Paper and made the pinwheel just like we did as kids.  Multipurpose Liquid Glue holds down the sucker stick and dimensionals hold the pinwheel at the top.  The card base is an envelope without the flap so the inside piece can slide in and out. 


Sunday, October 10, 2010

Halloween Spinner

I had to have the Bitty Bat punch when the new catalog came out, and after a long wait, we are in the season for bat making!  My stamp club will be making this spinner card Tuesday night.  It features the bat punch inside and out.  For added dimension, I scored the wings on a couple of the bats.  We also used the jumbo wheel, Frightful Fences, and the sentiment came from Grateful Greetings. 

To Order Stampin' Up! Products On-Line 24/7, CLICK HERE!

Thursday, October 7, 2010

Muffin Tins for Stamping?

For those of you who have been to an auction, you might know what this is like.  The item I really wanted to bid on was up next.  But the box of junk they were trying to sell right before wasn't getting bids so they lumped it all together.  So in addition to getting that "just have to have item" (I don't even remember what it was) I got a lot of junk too.  Who knew that in my box of junk would be 3 muffin tins and how handy they would be?  I have used them for school projects and now for stamping! 

The owl punch punches multiple pieces, and for best results you need to switch up the colors.  So instead of wasting unused pieces, I started collecting them in this tin.  Now I have pieces I can just pull out and start experimenting. 

This was my monthly tip in my October newsletter.  If you would like to receive my newsletter too, sign up in the sidebar!
To Order Stampin' Up! Products On-Line 24/7, CLICK HERE!

Tuesday, October 5, 2010

Clearance Rack Blitz

Wow!  Stampin' Up! has put over 200 additional items on clearance - some up to 80% off!  To check it out, CLICK HERE!  The Clearance Rack Blitz is going to last until October 18. 

Monday, October 4, 2010

Wicked Cool Waterfall

We made Halloween cards using Wicked Cool on Friday night.  And while talking to my friend, Mary, about waterfall cards, I realized this set would be perfect for a waterfall card since all of the stamps are about the same size.  I used some of the same colors and stamps as we did Friday night to make this card.  So by combining ideas from another card and a technique I have done before, this was a pretty quick project.     


 The words Trick or Treat, Scary and Sweet comes from the Grateful Greetings set, and I used En Francais, and of course Wicked Cool.  I used a couple of Glimmer Brads for a little bit of color on the Rich Razzleberry/Whisper White combo.  For more information about waterfall cards, visit this post

Sunday, October 3, 2010

Fall Stamp-a-Stack Card


For our last Stamp-a-Stack card, we made a Fall card using one of my favorite stamp sets, Just Believe.  This time we just stamped the whole image with Cherry Cobbler and layered it with Early Espresso cardstock and ribbon for a Fallish look. 


Wednesday, September 29, 2010

Friday Night Thanksgiving Card

We are doing Fall cards this Friday at my Stamp-a-Stack.  Here's another one of the cards we will be doing.  Let me know if you would like to join us!

Sunday, September 26, 2010

Wicked Cool Halloween

I am getting ready for this Friday's Stamp-a-Stack where we'll be making a Halloween card, a Fall card and a Thanksgiving card.  I made some changes to this Halloween card I made for my convention swap for our first one. 

To Order Stampin' Up! Products On-Line 24/7, CLICK HERE!
Related Posts with Thumbnails
 
Pin It button on image hover